
Step 1: Ensure your iPhone is up to date with the latest software. This may take some time, please be patient!
Go to Settings on your phone > General > Software Update and toggle on 'iOS Updates'


Step 2: To download the my-eforce mobile app, search 'eforce' in the App Store and press ‘GET’ or the tap the download icon.
For help or questions on the App Store, please visit www.support.apple.com for more information.
my-eforce is continuously improving and adding new features, so new releases are frequent!
Enabling automatic app updates on your iPhone will ensure you are always up to date:
Go to Settings on your phone > App Store and toggle on ‘App Updates’
For help or questions on managing App settings on your iPhone, please visit Apple Support for more information.

To login to my-eforce, open the my-eforce app and then:

Tip: Your Password is hidden for your privacy, but you can ensure you’ve entered it correctly entered by clicking on the eye icon.
Tip: If you forgot your password, press ‘Forgot Password’ and an email will be sent with instructions to reset.
Once you have logged in, you have one more step to connect to emergency dispatch support:
> Press ‘Connect’

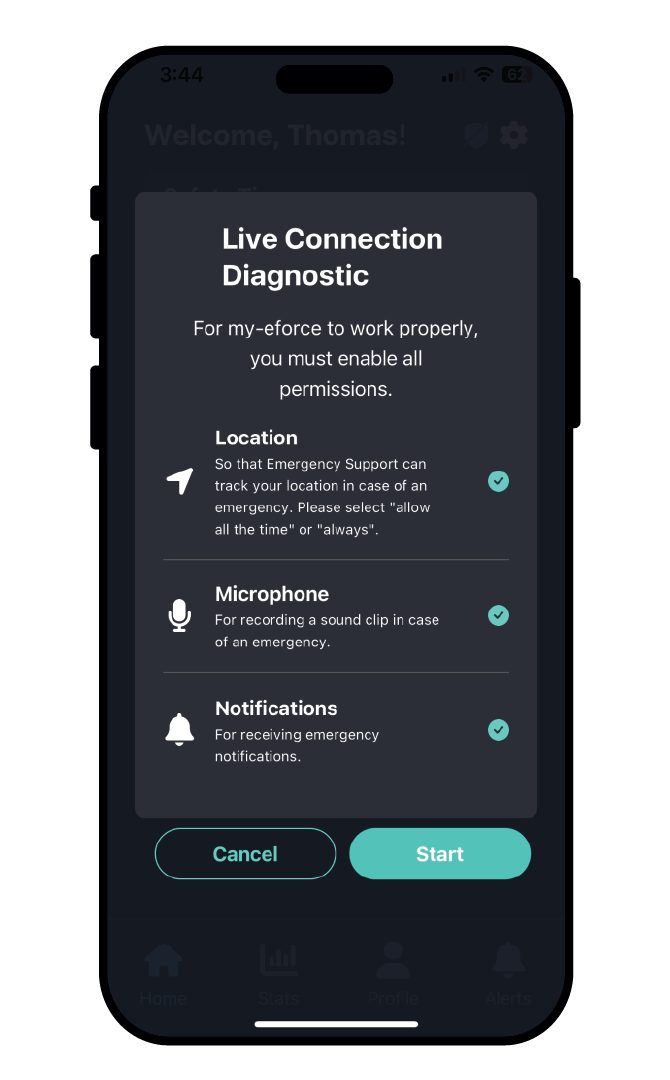
The Live Connection Diagnostic screen will then show you if you have the proper permissions enabled.
Press ‘Start’ when all check marks are green. This will enable your live Connection.
The Live Connection Diagnostic ensures you have the proper permissions enabled.
If any permissions are disabled, you will see an x indicating that you need to take action to correct.
Press ‘Fix’ to enable the permission. All are required to enable your live connection to emergency dispatch support.


When the SOS button turns red, you are now LIVE and connected to emergency dispatch support.
In order for my-eforce to keep you protected and connected, you will need to ensure the following permissions are enabled at all times:

my-eforce requires this permission to send you help in case of an emergency.
Step 1: Please select ‘Continue’.
Step 2: Please select ‘Allow While Using App’.


my-eforce also requires the Background Location Permission to ensure your location can be accessed at all times while connected to the app.
Step 1: Please select ‘Continue’
Step 2: Please select ‘Change to Always Allow’
my-eforce requires this permission to access to your microphone in the event of an emergency.
> Please select 'Allow'
When you hit your SOS, a 5-second sound clip will be sent to emergency dispatch support.
Tip: Please provide as much information as you can, such as the floor if you are in a tall building, or saying ‘help, police, ambulance,’ etc.

In case of an emergency, my-eforce requires this permission to allow emergency dispatch support to send you messages, which will be displayed in the Notification centre in the app.
> Please select ‘Allow’.
my-eforce allows you to use Biometrics such as Face ID or Touch ID for ease logging in to the app. If you would like to enable this feature, please select ‘Yes’.


You can always turn it on or off at a later time if you should change your mind. You can access this in Settings.
If you are in an emergency situation and cannot dial 911, you can activate the SOS which will send your information, including location and sound clip to Emergency Support. They are trained to triage your alert and will respond immediately.
If Emergency Support cannot verify that you are in an emergency from the sound clip, they will call you to confirm your situation.
If after 2 attempts you do not answer, they will then call your emergency contact. If this person also does not respond, they will send emergency responders to your location.
Step 1: To activate the SOS, hit the red SOS button at the bottom of the screen.
Step 2: Slide the red slider all the way to the right.


Step 3: Leave a sound clip with as much information as you can.
Step 4: If you can and it would be helpful for responders, please add in any additional information in the text field.


Step 5: Your SOS will show as “claimed” and expect a call from Emergency Support!
SOS Tips:
If you are in an emergency and cannot dial 911, please hit your SOS and leave as much detail as possible in your 5 second sound clip.
If you are in a parkade or multi-level building, please indicate what floor you are on either in the sound clip or by adding additional information in the text field.
Emergency Support will skip the verification phone calls and immediately send you help if they hear any of the following words or sounds:
"Help, police, ambulance, fire, emergency, 911, screaming, fighting, glass shattering, gurgling, choking sounds, etc”
my-eforce supports periodic Check Ins for your team. This feature provides a very simple way for your people to let you know that they are safe and sound at a regular prescribed interval throughout their workday.
If Check Ins are enabled for your team, then the Check In information and countdown will be active on the home screen in the large circle.


When the countdown timer expires, you will be prompted to Check In
To do that, simply hit the green Check In button. This will inform Support that you are safe, and a new checkin timer will begin.
If you do not complete your Check In within 5 minutes of the prompt, then Emergency Support will be alerted and will call you.
my-eforce provides added security for you when you are entering an uncomfortable situation that has potential to escalate.
The Safety Timer allows you to share your activity, location and other important information in situations that have potential to escalate.
If you do not cancel your Safety Timer before it expires, it will automatically trigger an SOS, which will be responded to by Emergency Support.

Step 1: Start the Timer
> Please select ‘Start Safety Timer’
Step 2: Set the Timer
> Please scroll to select how long of countdown you would like, up to 60 minutes
Step 3: Add any additional important details about your location.
Step 4: Leave a Recording
> Please Tap to Start Recording and leave any relevant details about your situation
Step 5: Start Emergency Timer
> Press the green “Start Emergency Timer” button at the bottom of the screen
If you situation should resolve in before the countdown expires, you can cancel the Safety Timer
> Press End Timer


If you do not cancel the Safety Timer before the countdown expires, then it will automatically trigger and SOS which will be received by Emergency Support. They will call you.
Ghost Mode™ ensures your location is kept private from emergency dispatch support.
However, if you trigger any alerts while in Ghost Mode™ however, your location and other emergency information will automatically become known to emergency dispatch support.

To turn Ghost Mode™ on and off:
Go to Settings in the app > toggle on Ghost Mode™ or
Simply toggle on the Ghost Icon on the Home page. A green icon means it is on and you are private.
Emergency Support
Your LIVE connection to Emergency Support is critical to ensuring you get help when and where you need it.
Emergency Support will receive an alert upon the following events:
When Emergency Support receives an alert, they will respond as follows:
When you no longer need to be connected and protected, be sure to Disconnect from the app.
Go to the Home screen > tap ‘Disconnect’> Press the red ‘Disconnect’ button
You are now disconnected from emergency dispatch support.

Tip: You do not need to Logout of the app. Once you ‘Disconnect’, emergency dispatch support is no longer live.
Tip: Please disconnect from my-eforce when exercising so that you do not trigger any false alerts.
Step 1: Ensure your Samsung Phone is up to date with the latest software. This may take the longest!
Go to Settings on your phone > ‘Software Update’.
Turn on ‘Auto download over Wi-Fi’.
Press ‘Download and Install’ if there are any available updates


Step 2: To download the my-eforce mobile app, search ‘eforce’ in the Google Play Store and press ‘Install’
For help or questions on the Google Play Store, please visit Google Play Support for more information.
my-eforce is continuously improving and adding new features, so new releases are frequent!
Enabling ‘Auto-update apps’ on your Galaxy Phone will ensure you are always up to date:
You will then need to select either:
“Update all apps over Wi-Fi or mobile data”, or
“Update over Wi-Fi only”
For help or questions on the App settings on your Samsung Phone, please visit Samsung Support for more information.

To login to my-eforce, open the my-eforce app and then:
Tip: Your Password is hidden for your privacy, but you can ensure you’ve entered it correctly entered by clicking on the eye icon.
Tip: If you forgot your password, press ‘Forgot Password’ and an email will be sent with instructions to reset.
Once you have logged in, you have one more step to connect to emergency dispatch support:
> Press ‘Connect’
The Live Connection Diagnostic screen will then show you if you have the proper permissions enabled.
Press ‘Start’ when all check marks are green. This will enable your live Connection.
The Live Connection Diagnostic ensures you have the proper permissions enabled.
If any permissions are disabled, you will see an x indicating that you need to take action to correct.
Press ‘Fix’ to enable the permission. All are required to enable your live connection to emergency dispatch support.
When the SOS button turns red, you are now LIVE and connected to emergency dispatch support.
In order for my-eforce to keep you protected and connected, you will need to ensure the following permissions are enabled at all times:

my-eforce requires this permission to send you help in case of an emergency.
Step 1: Please select ‘Continue’.
Step 2: Please select ‘Allow While Using App’.


my-eforce also requires the Background Location Permission to ensure your location can be accessed at all times while connected to the app.
Step 1: Please select ‘Continue’
Step 2: Please select ‘Change to Always Allow’
my-eforce requires this permission to access to your microphone in the event of an emergency.
> Please select 'Allow'
When you hit your SOS, a 5-second sound clip will be sent to emergency dispatch support.
Tip: Please provide as much information as you can, such as the floor if you are in a tall building, or saying ‘help, police, ambulance,’ etc.


In case of an emergency, my-eforce requires this permission to allow emergency dispatch support to send you messages, which will be displayed in the Notification centre in the app.
> Please select ‘Allow’.
If you are in an emergency situation and cannot dial 911, you can activate the SOS which will send your information, including location and sound clip to Emergency Support. They are trained to triage your alert and will respond immediately.
If Emergency Support cannot verify that you are in an emergency from the sound clip, they will call you to confirm your situation.
If after 2 attempts you do not answer, they will then call your emergency contact. If this person also does not respond, they will send emergency responders to your location.
Step 1: To activate the SOS, hit the red SOS button at the bottom of the screen.
Step 2: Slide the red slider all the way to the right.
Step 3: Leave a sound clip with as much information as you can.
Step 4: If you can and it would be helpful for responders, please add in any additional information in the text field.
Step 5: Your SOS will show as “claimed” and expect a call from Emergency Support!
SOS Tips:
If you are in an emergency and cannot dial 911, please hit your SOS and leave as much detail as possible in your 5 second sound clip.
If you are in a parkade or multi-level building, please indicate what floor you are on either in the sound clip or by adding additional information in the text field.
Emergency Support will skip the verification phone calls and immediately send you help if they hear any of the following words or sounds:
"Help, police, ambulance, fire, emergency, 911, screaming, fighting, glass shattering, gurgling, choking sounds, etc”
my-eforce supports periodic Check Ins for your team. This feature provides a very simple way for your people to let you know that they are safe and sound at a regular prescribed interval throughout their workday.
If Check Ins are enabled for your team, then the Check In information and countdown will be active on the home screen in the large circle.
When the countdown timer expires, you will be prompted to Check In
To do that, simply hit the green Check In button. This will inform Support that you are safe, and a new checkin timer will begin.
If you do not complete your Check In within 5 minutes of the prompt, then Emergency Support will be alerted and will call you.
my-eforce provides added security for you when you are entering an uncomfortable situation that has potential to escalate.
The Safety Timer allows you to share your activity, location and other important information in situations that have potential to escalate.
If you do not cancel your Safety Timer before it expires, it will automatically trigger an SOS, which will be responded to by Emergency Support.
Step 1: Start the Timer
> Please select ‘Start Safety Timer’
Step 2: Set the Timer
> Please scroll to select how long of countdown you would like, up to 60 minutes
Step 3: Add any additional important details about your location.
Step 4: Leave a Recording
> Please Tap to Start Recording and leave any relevant details about your situation
Step 5: Start Emergency Timer
> Press the green “Start Emergency Timer” button at the bottom of the screen
If you situation should resolve in before the countdown expires, you can cancel the Safety Timer
> Press End Timer
If you do not cancel the Safety Timer before the countdown expires, then it will automatically trigger and SOS which will be received by Emergency Support. They will call you.
Ghost Mode™ ensures your location is kept private from emergency dispatch support.
However, if you trigger any alerts while in Ghost Mode™ however, your location and other emergency information will automatically become known to emergency dispatch support.
To turn Ghost Mode™ on and off:
Go to Settings in the app > toggle on Ghost Mode™ or
Simply toggle on the Ghost Icon on the Home page. A green icon means it is on and you are private.
Emergency Support
Your LIVE connection to Emergency Support is critical to ensuring you get help when and where you need it.
Emergency Support will receive an alert upon the following events:
When Emergency Support receives an alert, they will respond as follows:
When you no longer need to be connected and protected, be sure to Disconnect from the app.
Go to the Home screen > tap ‘Disconnect’> Press the red ‘Disconnect’ button
You are now disconnected from emergency dispatch support.
Tip: You do not need to Logout of the app. Once you ‘Disconnect’, emergency dispatch support is no longer live.
Tip: Please disconnect from my-eforce when exercising so that you do not trigger any false alerts.
If you would like to use my-eforce on your wearable, you will need to specifically download the app on your watch.
Step 1: Ensure your watch is up to date with the latest software. This update could take a while!
Go to ‘Settings’ on your watch > ‘Software Update’ and toggle on ‘Automatic updates’


Step 2: To download the my-eforce app, search for ‘eforce’ on the App Store directly from your watch and press ‘Get’
For help or questions on the App Store on your Apple Watch, please visit www.support.apple.com for more information.
my-eforce is continuously improving and adding new features, so new releases are frequent!
Enabling ‘Automatic Updates’ on your Apple Watch will ensure you are always up to date:
For help or questions on your Apple Watch, please visit www.support.apple.com for more information.
To login to my-eforce, open the my-eforce app and then:
Tip: Your Password is hidden for your privacy, but you can ensure you’ve entered it correctly entered by clicking on the eye icon.
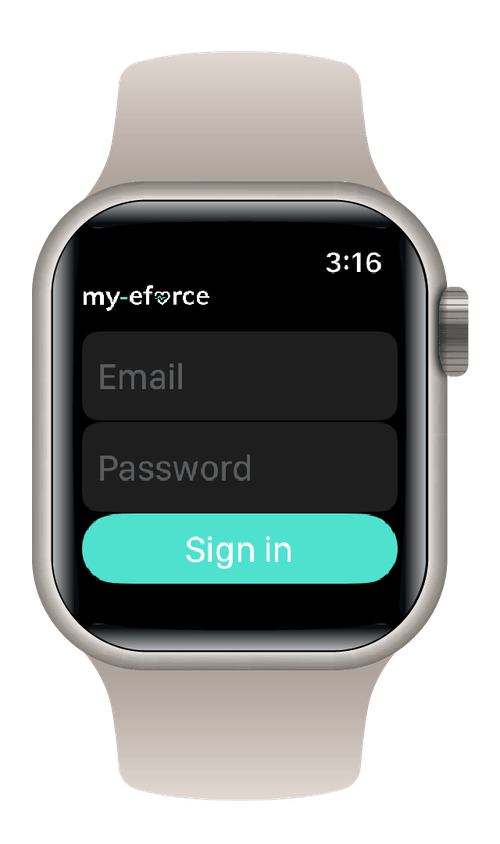

Tip: If you forgot your password, press ‘Forgot Password’ and an email will be sent with instructions to reset.
PRO Tip! Apple has a great feature that allows you to enter text with your iPhone. When you start composing a message on your watch and your paired iPhone is nearby, a notification appears on the iPhone, offering to let you enter text using the iOS keyboard. Tap the notification, then type the text on your iPhone.
Once you have logged in, you have one more step to connect to emergency dispatch support:
> Press 'Connect'
You will know when you are connected as the SOS button will appear. If you have enabled Health permissions you will see your heart rate (bpm).

In order for my-eforce to keep you protected and connected, you will need to ensure the following permissions are enabled at all times:

my-eforce requires you to link your Apple Watch to your account.
> Please select 'Link Device'
my-eforce requires this permission to access to your microphone in the event of an emergency.
When you hit your SOS, a 5-second sound clip will be sent to emergency dispatch support:
> Please select 'Allow'
Tip: Please provide as much information as you can, such as the floor that you are on if you are in a tall building, or saying ‘help, police, ambulance,’ etc.


In case of an emergency, my-eforce requires this permission to allow emergency dispatch support to send you messages.
> Please select 'Allow'
my-eforce requires this permission to send automatic alerts to emergency dispatch support should you experience extreme High or Low Heart Rates
Step 1: Health Access: Please select ‘Review’


Step 2: Read Access: Please select ‘All Requested Data’
You should then see your Heart Rate (bpm) in the left circle on the my-eforce app when you are connected.
my-eforce requires this permission to send you help in case of an emergency:
Step 1: Please select ‘Turn On’


Step 2: Please select ‘Allow While Using App’ and toggle on 'Precise' location
my-eforce also requires the Background Location Permission to ensure your location can be accessed at all times while connected to the app.
> Please select 'Change to Always Allow'


my-eforce requires access to Fall Detection in order send automatic alerts should you have a serious slip, trip or fall.
> Please select 'Share Data'
Ghost Mode™ ensures your location is kept private from emergency dispatch support.
However, if you trigger any alerts while in Ghost Mode™, your location and other emergency information will automatically become known to emergency dispatch support.


To turn Ghost Mode™ on:
To turn Ghost Mode™ off:
If you are in an emergency and cannot dial 911, please hit your SOS and leave as much detail as possible in your 5 second sound clip.


If emergency dispatch support cannot verify that you are in an emergency from the sound clip, they will call you to confirm your situation. If you do not answer the first call, they will call you a second time.
If you do not answer either calls, they will call your emergency contact. If neither you nor your emergency contact answer, emergency responders will be sent to your location.

SOS Tips:
If you are in an emergency and cannot dial 911, please hit your SOS and leave as much detail as possible in your 5 second sound clip.
If you are in a parkade or multi-level building, please indicate what floor you are on.
Emergency Dispatch support will skip the verification phone calls and immediately send you help if they hear any of the following words or sounds:
Your LIVE connection to emergency dispatch support is critical to ensuring you get help when and where you need it.
Emergency dispatch support will receive an alert upon the following events:
When emergency dispatch support receives an alert, they will respond as follows:
And the ‘2-Strike Rule’
To reduce the risk of sending emergency services when they are not needed - the cost of which will be your responsibility - please adhere to the following:
2-Strike Rule: Should you trigger 2 or more false alarms where emergency responders are unnecessarily dispatched to your location, my-eforce reserves the right to suspend or terminate your service.
When you no longer need to be connected and protected, be sure to Disconnect from the app.
Simply press 'Disconnect' to remove your connection to live emergency dispatch support.
Tip: You do not need to Logout of the app. Once you ‘Disconnect’, emergency dispatch support is no longer live.
Tip: Please disconnect from my-eforce when exercising so that you do not trigger any false alerts.
If you would like to use my-eforce on your wearable, you will need to specifically download the app on your watch.
Step 1: Ensure your watch is up to date with the latest software. This update could take a while, please be patient!
Go to ‘Settings’ on your watch > ‘Software Update’ and toggle on ‘Auto update’


Step 2: To download the my-eforce app, search for ‘eforce’ on the Google Play Store directly from your watch and press ‘Get’ or 'Install'.
For help or questions on the Google Play Store, please visit Google Play Support for more information.
my-eforce is continuously improving and adding new features, so new releases are frequent!
Enabling ‘Automatic Updates’ on your Samsung smartwatch will ensure you are always up to date:
For help or questions on the Galaxy Wearables, please visit Galaxy Wearable Support for more information.

To login to my-eforce, open the my-eforce app and then:


Tip: Your Password is hidden for your privacy, but you can ensure you’ve entered it correctly entered by clicking on the eye icon.
Tip: If you forgot your password, press ‘Forgot Password’ and an email will be sent with instructions to reset.
Once you have logged in, you have one more step to connect to emergency dispatch support:
> Press 'Connect'
You will know when you are connected as the SOS button will appear. If you have enabled Health permissions you will see your heart rate (bpm).

In order for my-eforce to keep you protected and connected, you will need to ensure the following permissions are enabled at all times:


In case of an emergency, my-eforce requires this permission to allow emergency dispatch support to send you messages.
> Please select 'Allow'
my-eforce requires you to link your Samsung Watch to your account.
> Please select 'Link Device'

my-eforce requires this permission to access to your microphone in the event of an emergency.
When you hit your SOS, a 5-second sound clip will be sent to emergency dispatch support:
> Please select 'Allow'
Tip: Please provide as much information as you can, such as the floor you are on if you are in a tall building, or saying ‘help, police, ambulance,’ etc.
my-eforce requires this permission to send automatic alerts to emergency dispatch support should you experience extreme High or Low Heart Rates:
Step 1: Access Physical Activity: Please select ‘Allow’


Step 2: Vital signs: Please select ‘While using app’
You should then see your Heart Rate (bpm) on the my-eforce app when you are connected.
my-eforce requires this permission to send you help in case of an emergency:
Step 1: Enable location: Please press ‘Accept’


Step 2: Allow to access this device’s location:
Please toggle on ‘Precise Location’ and then select ‘While using app’
my-eforce also requires the Background Location Permission to ensure your location can be accessed at all times while connected to the app.
Step 1: Location data: Please press 'Accept'


Step 2: Allow to access this location
Please toggle on ‘Precise Location’ and then select ‘All the time'
Step 3: Swipe right to take you to the app home screen.
Ghost Mode™ ensures your location is kept private from emergency dispatch support.
However, if you trigger any alerts while in Ghost Mode™ however, your location and other emergency information will automatically become known to emergency dispatch support.

To turn Ghost Mode™ on:
To turn Ghost Mode™ off:
If you are in an emergency and cannot dial 911, please hit your SOS and leave as much detail as possible in your 5 second sound clip.

If emergency dispatch support cannot verify that you are in an emergency from the sound clip, they will call you to confirm your situation. If you do not answer the first call, they will call you a second time.
If you do not answer either calls, they will call your emergency contact. If neither you nor your emergency contact answer, emergency responders will be sent to your location.

SOS Tips:
If you are in an emergency and cannot dial 911, please hit your SOS and leave as much detail as possible in your 5 second sound clip.
If you are in a parkade or multi-level building, please indicate what floor you are on.
Emergency Dispatch support will skip the verification phone calls and immediately send you help if they hear any of the following words or sounds:
Your LIVE connection to emergency dispatch support is critical to ensuring you get help when and where you need it.
Emergency dispatch support will receive an alert upon the following events:
When emergency dispatch support receives an alert, they will respond as follows:
To reduce the risk of sending emergency services when they are not needed - the cost of which will be your responsibility - please adhere to the following:
The 2-Strike Rule: Should you trigger 2 or more false alarms where emergency responders are unnecessarily dispatched to your location, my-eforce reserves the right to suspend or terminate your service.
When you no longer need to be connected and protected, be sure to Disconnect from the app.
Simply press 'Disconnect' to remove your connection to live emergency dispatch support.
Tip: You do not need to Logout of the app. Once you ‘Disconnect’, emergency dispatch support is no longer live.
Tip: Please disconnect from my-eforce when exercising so that you do not trigger any false alerts.
